Genau XT-350 Exercise Bike
User Manual
Contents
Thank you for your purchase!
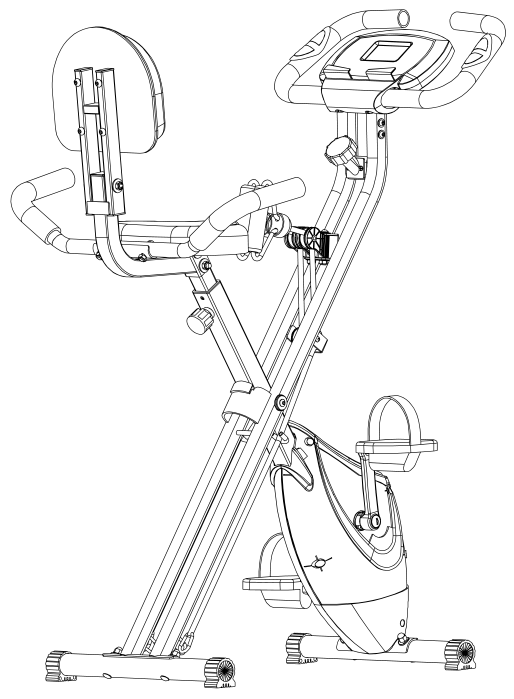
Thank you for purchasing the Genau XT-350 exercise bike. Please use the equipment correctly to ensure your safety and health. Read the information below carefully before use.
Please read this manual before assembling and using the exercise bike.
As part of our commitment to continuous improvement, the product may be updated when necessary without prior notice. If this manual does not match the product, the actual product takes precedence.
Safety Instructions
- Before starting any training, it is recommended to consult a doctor, especially if you have chronic or cardiovascular diseases, or if you take medication that affects blood pressure, heart rate or cholesterol levels.
- Pay attention to how your body responds. Incorrect or excessive exercise can harm your health. Stop exercising if you feel chest pain, palpitations, shortness of breath, dizziness, nausea or weakness. See a doctor if necessary.
- Keep children and pets away from the exercise bike. The equipment is intended for use by adults only.
- Place the exercise bike on a level, stable surface, preferably on a protective mat. For safe operation, leave at least 0.5 m of free space around it.
- Before use, make sure all bolts and nuts are securely tightened.
- Regularly check the equipment for damage or wear.
- Use the exercise bike only for its intended purpose. If you notice a malfunction or hear an unusual noise during assembly or use, stop using it immediately until the problem is fixed.
- Wear comfortable sportswear. Avoid loose clothing that could get caught in moving parts.
- Maximum user weight: 110 kg. For home use only.
- The exercise bike is not intended for therapeutic use.
- When moving the exercise bike, use proper lifting techniques or ask for help.
Product Components
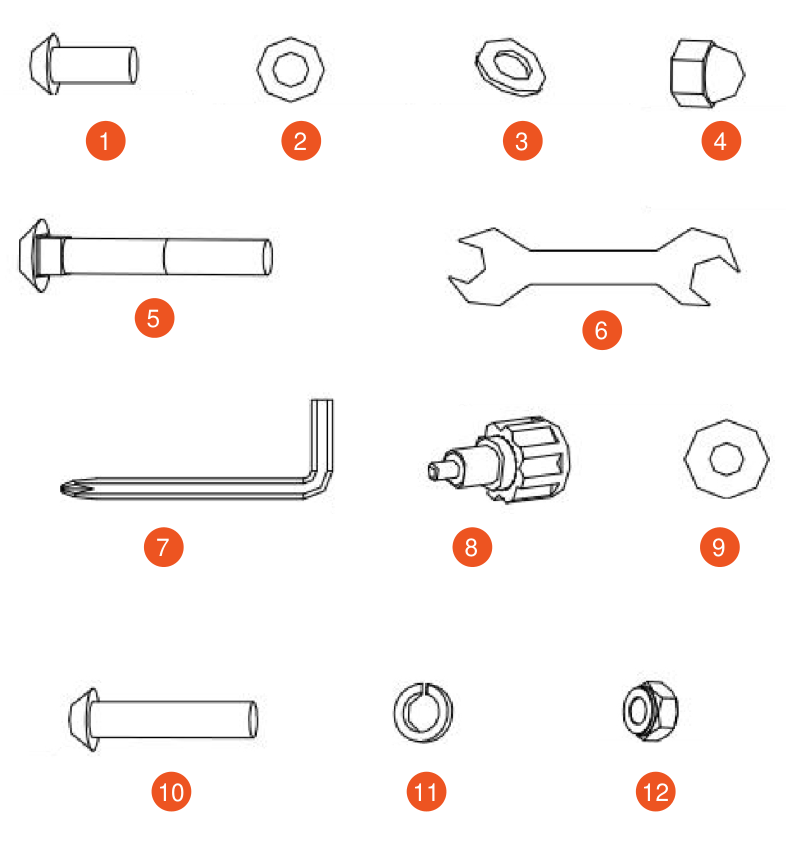
- Screw (M6×15) — 4 pcs
- Flat washer (18×1.5) — 4 pcs
- Curved washer (20×1.5) — 6 pcs
- Cap nut (M8) — 4 pcs
- Hex socket bolt (M8×50) — 6 pcs
- Open-end wrench (13–1) — 1 pc
- Hex key — 1 pc
- Adjustment knob (M16×1.25) — 1 pc
- Flat washer (24×1.5) — 2 pcs
- Screw (M8×35) — 2 pcs, screw (M8×45) — 4 pcs
- Nut 14×2 — 4 pcs
- Self-locking nut (Nyloc) M8 — 3 pcs
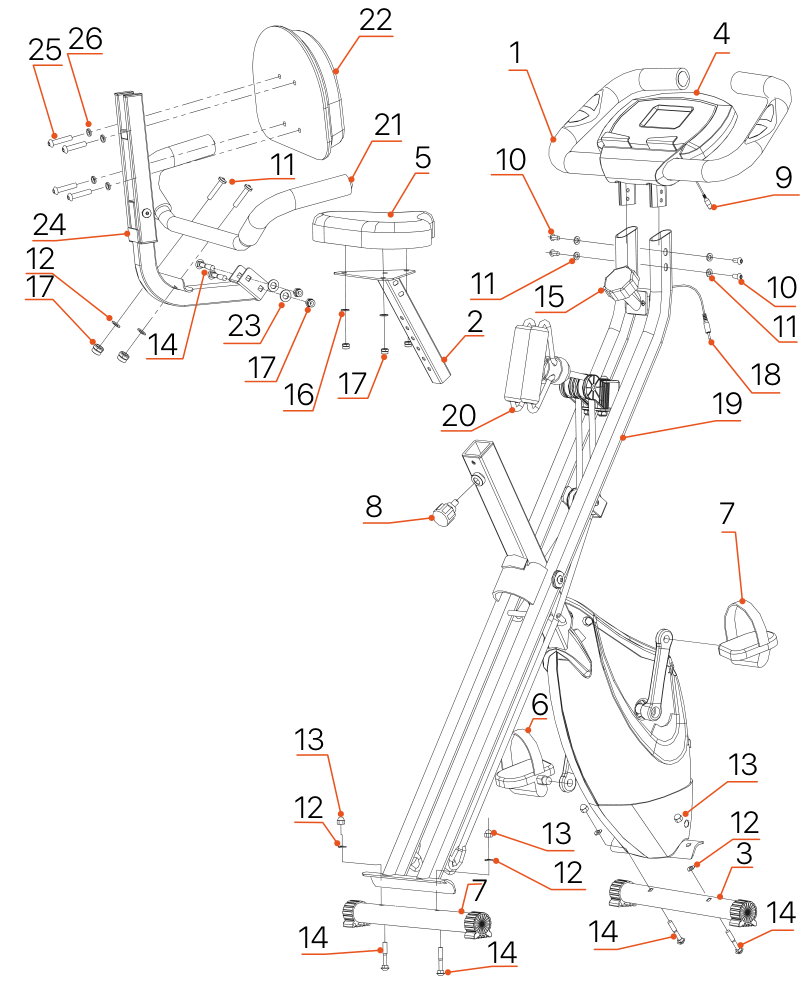
| No. | Item | Specification | Qty |
|---|---|---|---|
| 1 | Handlebar | 1 | |
| 2 | Seat (post) | 1 | |
| 3 | Stabilizer | 2 | |
| 4 | Electronic console | 1 | |
| 5 | Seat | 1 | |
| 6 | Pedal (left) | 1 | |
| 7 | Pedal (right) | 1 | |
| 8 | Adjustment knob | M16×1.25 | 1 |
| 9 | Sensor A | 1 | |
| 10 | Bolt | M6×15 | 4 |
| 11 | Flat washer | 18×1.5 | 4 |
| 12 | Curved washer | 20×1.5 | 4 |
| 13 | Cap nut | M8 | 4 |
| 14 | Hex socket bolt | M8×50 | 6 |
| 15 | Resistance mechanism | 1 | |
| 16 | Flat washer | 18×1.5 | 3 |
| 17 | Self-locking nut (Nyloc) | M8 | 5 |
| 18 | Sensor B | 1 | |
| 19 | Main frame | 1 | |
| 20 | Cable | 2 | |
| 21 | Armrest | 1 | |
| 22 | Backrest (cushion) | 1 | |
| 23 | Flat washer | 24×1.5 | 2 |
| 24 | Backrest frame | 1 | |
| 25 | Screw | M8×45 | 4 |
| 26 | Nut | 14×2 | 4 |
Assembly
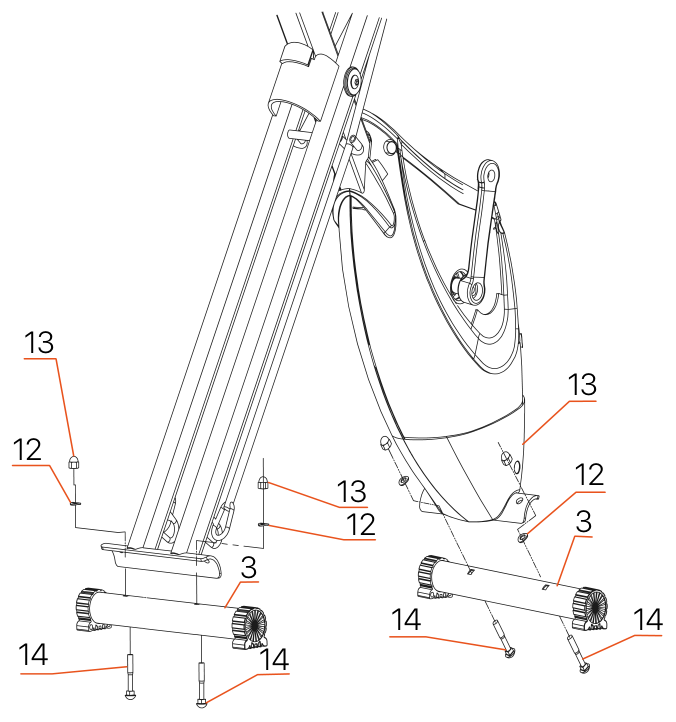
Take all the parts out of the boxes. Attach the front stabilizer (3) to the main frame (19) using two sets of hex socket bolts (14) and curved washers (12), and tighten the cap nuts.
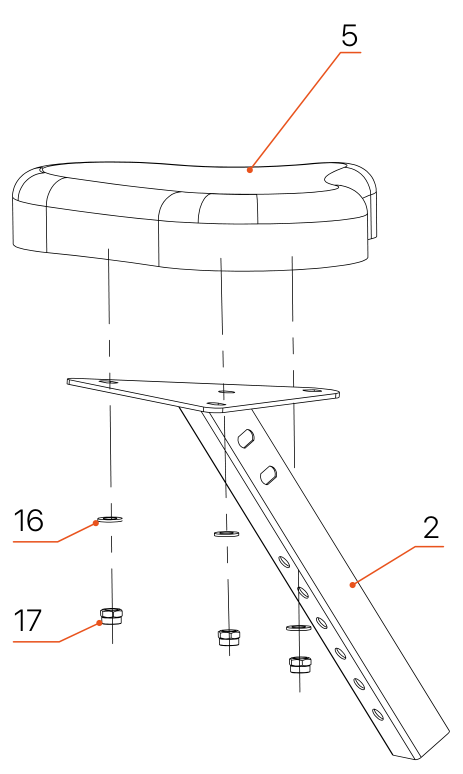
Place the seat (5) on the seat post (2). Insert the seat studs into the holes in the seat post. Secure the seat using the flat washers (16) and self-locking nuts (17).
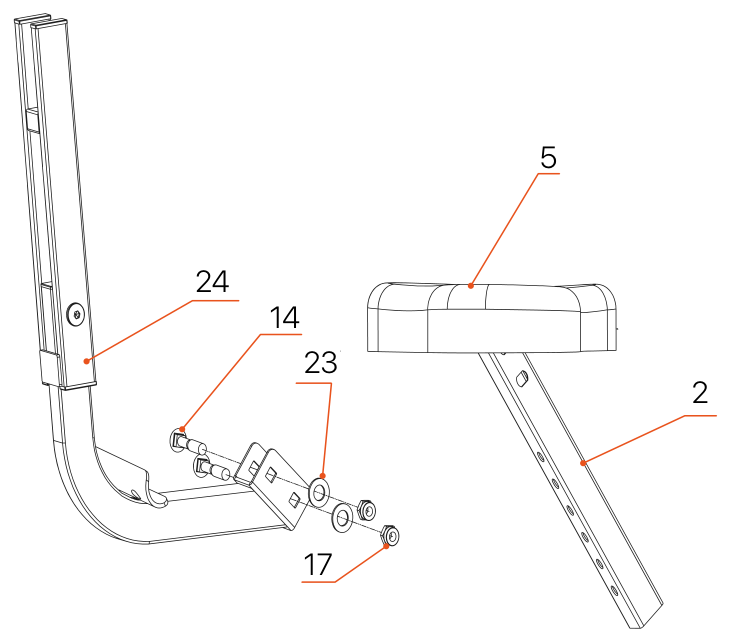
Attach the seat backrest (23) to the seat post (2) using two hex socket bolts (14) and two flat washers (22). Then tighten with the self-locking nuts (17).
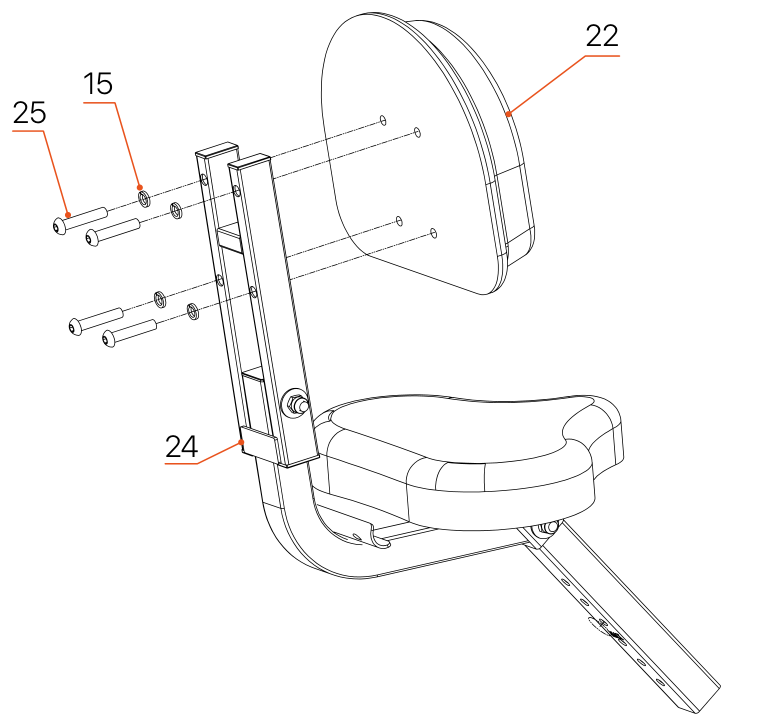
Attach the backrest cushion (22) to the backrest frame (24) using the screw (25) and nut (15).
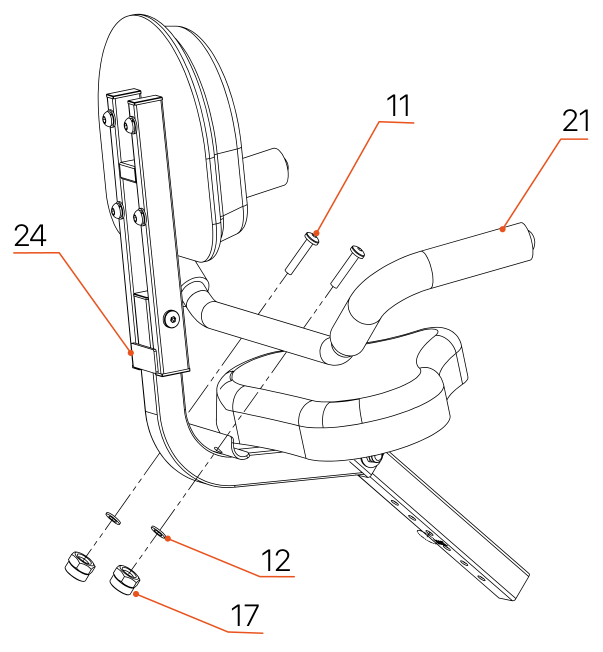
Attach the armrest (21) to the backrest frame (24) using two bolts (11), curved washers (12) and self-locking nuts (17).
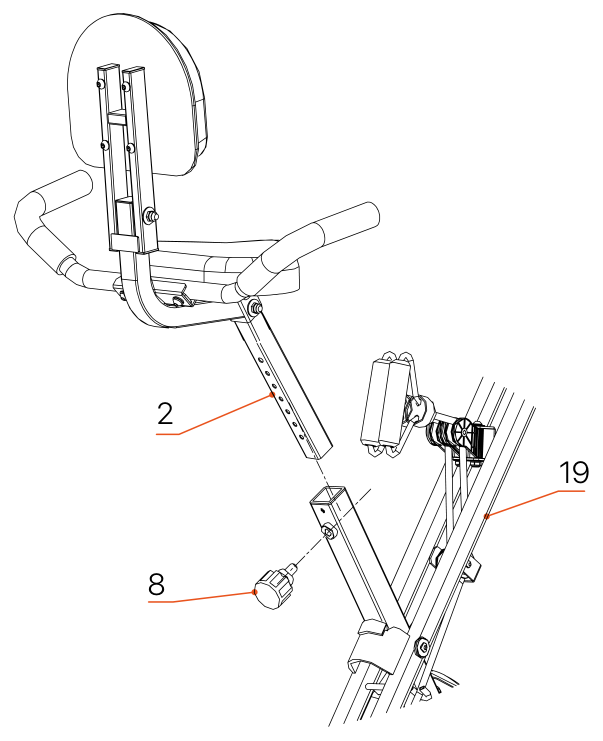
Attach the seat post (2) to the main frame (19) using the seat adjustment knob (8). The height can be adjusted during use.
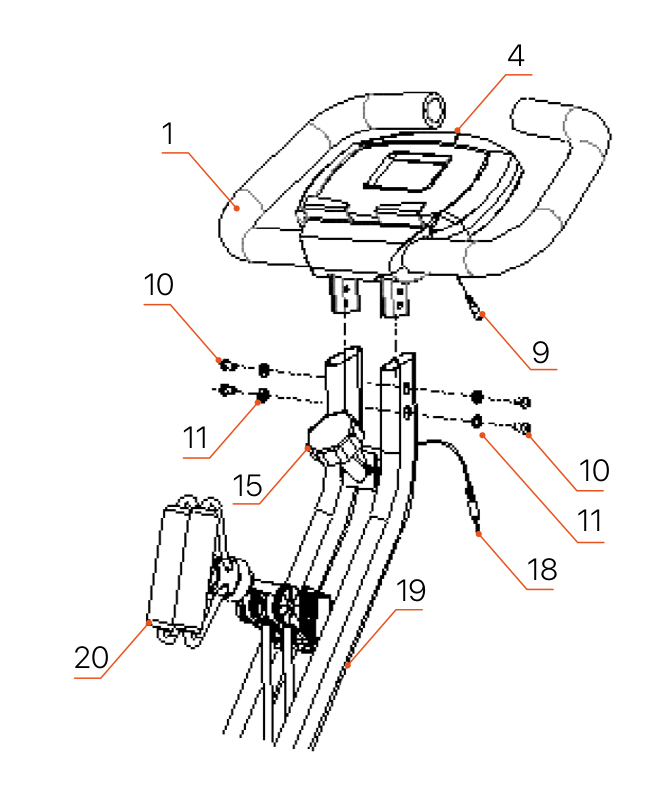
Insert the console frame into the main frame of the X bike as shown in the figure on the left. Attach the handlebar (1) to the main frame (19) using two bolts (10) and two flat washers (11). Then connect the wire: sensor A (9) to sensor B (18).
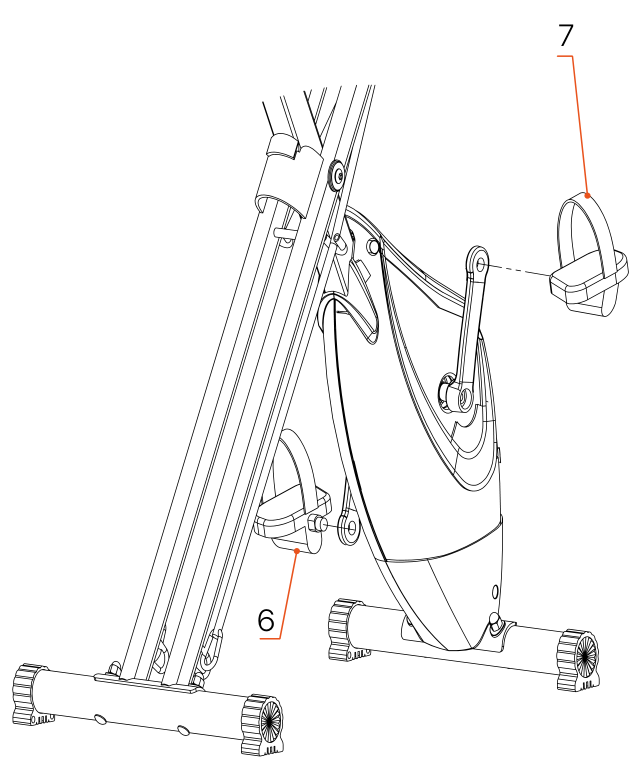
Pedals (6) and (7) are marked "L" and "R" — left and right. Attach them to the corresponding cranks. The right crank is on the right side of the bike when you are sitting on it. Note: the right pedal is screwed in clockwise, and the left pedal counterclockwise.
Monitor
Specifications
| Function | Description |
|---|---|
| Time (TMR) | 00:00–99:59 min |
| Speed (SPD) | 0.0–99.9 km/h |
| Distance (DST) | 0.00–999.9 km |
| Calories (CAL) | 0–9999 kcal |
| Pulse (PUL) | 40–240 bpm |
When the set workout is over, a beep will sound for 10 seconds. Press any button to turn off the beep.
If no values are set, counting starts automatically.
Operation
| Function | Description |
|---|---|
| TIME | Shows the duration of the workout. |
| SPEED | Shows the current speed. |
| DISTANCE | Shows the distance covered. |
| CALORIES | Shows the number of calories burned. |
| SCAN | Automatically cycles through TIME – SPEED – DISTANCE – PULSE – CALORIES. |
Batteries
The display runs on two "AA" or "AG13" batteries. The batteries can be replaced on the back of the unit.
Use
The seat height can be adjusted by removing the adjustment knob and raising or lowering the seat. The seat post has 7 holes that let you choose the right height. Once you have chosen the right level, put the adjustment knob back and tighten it.
The resistance adjustment knob lets you change the load on the pedals. High resistance makes pedaling harder, low resistance makes it easier. For best results, set the resistance while using the bike.
Care, Storage and Maintenance
Cleaning
Regular and thorough cleaning will extend the service life of the upright exercise bike.
Remove dust regularly to keep the exercise bike clean. Make sure your athletic shoes are clean and prevent foreign objects from getting inside the exercise bike.
Training Tips and Recommendations
Warm-up
At this stage, blood circulation increases and the muscles start working properly. It also reduces the risk of cramps and muscle injuries. It is recommended to do a few stretching exercises as shown below. Hold each exercise for about 30 seconds. Do not force your muscles to stretch through pain — if it hurts, stop.
Training phase
This is the stage where you put in the main effort. With regular training, your leg muscles become more flexible. Work at your own pace, but it is very important to keep a steady rhythm throughout the workout. The load should be high enough for your heart rate to reach the target zone shown in the chart below.
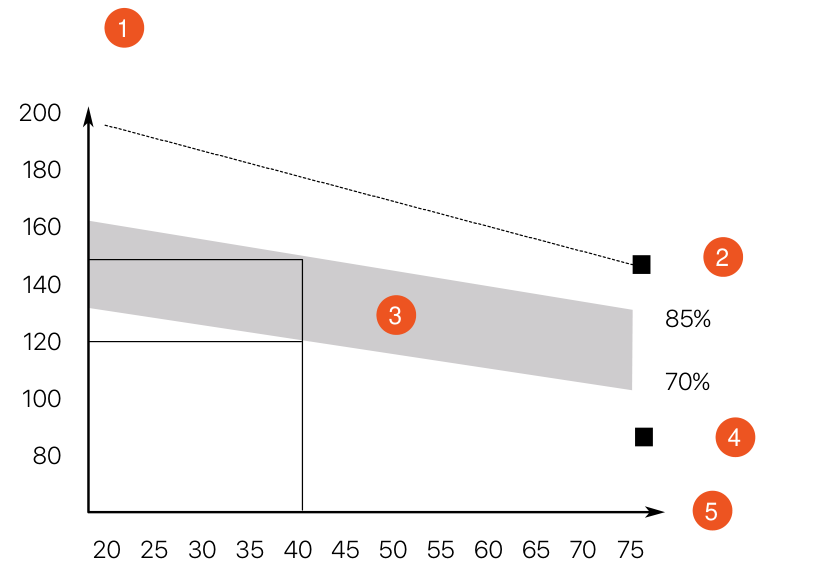
- Heart rate (HR)
- Maximum
- Target zone
- Cool-down
- Age
Cool-down phase
At this stage, the cardiovascular system and muscles gradually recover. It repeats the warm-up exercises — for example, slowing down and continuing light movements for about 5 minutes. Then it is recommended to repeat the stretching exercises without forcing your muscles to stretch through pain.
As your fitness improves, you will be able to train longer and harder. It is recommended to exercise at least three times a week and, if possible, spread your workouts evenly over the week.
Muscle tone
To work your muscles on the Genau XT-350, you need to set a fairly high resistance. This will increase the load on your leg muscles and may shorten the total workout time. If you also want to improve your overall fitness, you need to adjust your training program slightly. Start and finish the workout at a normal pace (warm-up and cool-down phases), and at the end of the main phase increase the resistance to make your legs work harder. At the same time, reduce your speed slightly so that your heart rate stays in the target zone.
Weight loss
The main factor here is the level of effort. The longer and harder you train, the more calories you burn. Essentially, this training is similar to training for fitness — the only difference is the goal.
Exercises
A successful exercise program consists of three parts: warm-up, cardio training and cool-down.
The warm-up is a very important part of a workout. It should be done before every workout. The warm-up helps warm up the body, stretch the muscles and let the body adapt to more intense exercise. Repeating the warm-up at the end of the exercise can help relieve muscle soreness.
We suggest doing appropriate warm-up and cool-down exercises according to the following scheme:
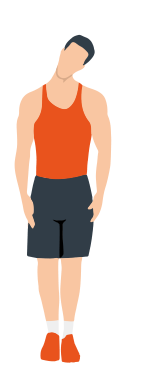
Head rolls
First tilt your head toward your right shoulder, stretch your neck and rotate your head once clockwise and once counterclockwise; then tilt your head toward your left shoulder and make one counterclockwise rotation. Repeat.
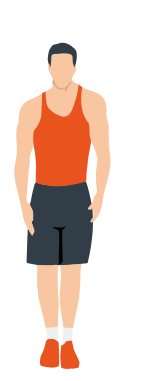
Shoulder lifts
Raise your left shoulder and make 5 backward rotations; then raise your right shoulder and make 5 backward rotations, alternating sides.
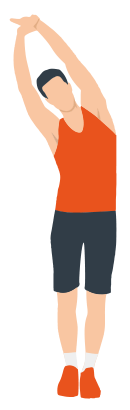
Side stretch
Raise your arms above your head, then grasp your right wrist with your left hand and reach upward until you feel your right arm fully stretched. Hold for 5 seconds before switching to the other arm.
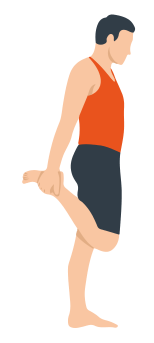
Quadriceps stretch
Holding onto a wall with your right hand for balance, pull your left foot back with your left hand, bringing the heel as close to your buttock as possible. Hold for 15 seconds, then repeat with the other leg.
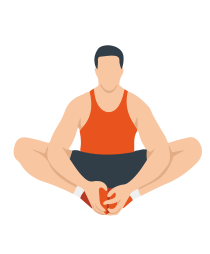
Inner thigh stretch
Sit on the floor, bring the soles of your feet together, hold them with both hands and pull them as close to your body as possible. Slowly press down on your heels and hold this position for 15 seconds.
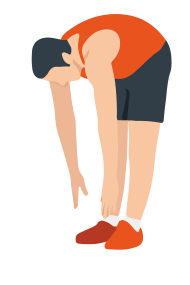
Toe touch
Slowly bend forward, relax your back and shoulders and reach for your toes. Bend as low as you can and hold the position for up to 15 seconds.
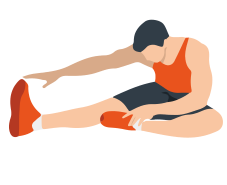
Hamstring stretch
Sit down, straighten your right leg and bend your left leg. Hold your left ankle with your left hand and pull it inward so that your left foot is as close to your body as possible, with the sole against the inner side of your right thigh. Then lean your body forward and reach both hands toward your toes — the deeper the stretch, the better. Hold this position for 15 seconds, then switch legs.
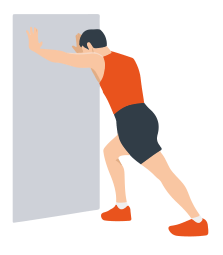
Calf stretch
Lean against a wall with both hands, tilt your body at a 45-degree angle to the floor and alternately move your left and right legs back, as if walking.
Warranty
Genau guarantees the high quality and reliability of its products. We strive to offer only the best, which is why all of our equipment comes with a warranty.
Warranty Terms
- The warranty period starts from the date of sale.
- The warranty covers defects caused by manufacturing faults or defective materials.
- Warranty service is carried out at authorized service centers.
- If the product breaks down during the warranty period, the customer must bring this warranty card and the complete product to a service center for diagnostics and repair.
- If the warranty claim is confirmed, the product will be repaired or replaced free of charge.
- The warranty does not cover the following cases:
- mechanical damage caused by improper use or transportation;
- damage caused by liquids, fire, chemicals or other external factors;
- failures caused by not following the operating instructions;
- modifications to the design or repairs carried out by unauthorized persons without the approval of the Service;
- consumables and components with a limited service life (belts, batteries, etc.).
Warranty claims
To receive warranty service, the customer should contact the seller (the place where the equipment was purchased).
Specifications
| Parameter | Value |
|---|---|
| Max. user weight | 110 kg |
Manufacturer address: No.651, Jiuzhou Road, Hardware Scientific-Technical Industrial Area, Yongkang City, Zhejiang.
Service
For questions about assembly, operation and warranty, please contact Genau service in Kyrgyzstan.
Genau GmbH LLC (ОсОО «Генау ГМБХ»), Kyrgyzstan. Phone: +996 778 639 000