Genau EA-350 inversion table
User Manual
Contents
Thank you for your purchase!
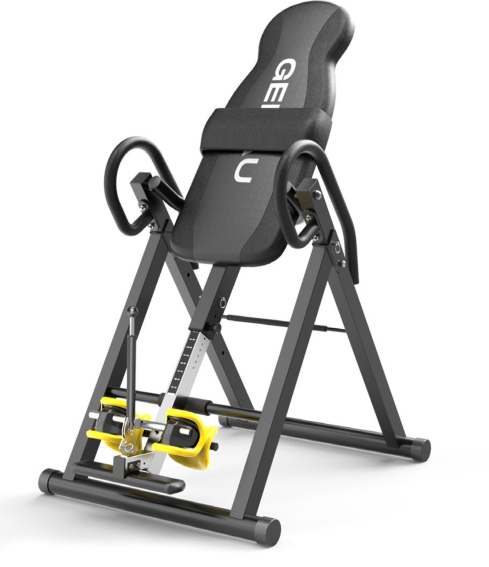
Thank you for purchasing a Genau inversion table. Please use the equipment correctly to ensure your safety and health. Read the information below carefully before use.
Please read this manual before assembling and using the treadmill.
As part of our commitment to continuous improvement, the product may be updated when necessary without prior notice. If this manual does not match the product, the actual product takes precedence.
Safety Instructions
This inversion table has been designed and built for optimal safety. However, some precautions are necessary when using the equipment. Correct use ensures your safety and health. Please read the requirements and recommendations.
Read and fully understand all instructions. Read all accompanying documents and carefully inspect the equipment before use. It is your responsibility to know how to use the device correctly and to understand the risks of inversion, such as falling, pinching or equipment failure. Remember that only correct assembly, maintenance and operation ensure the safety and effectiveness of your workouts.
WARNING - RISK OF INJURY
- Do not leave it within reach of children. Do not allow children to use the equipment.
- Use with caution if there are pets in the room: a pet's reaction or its movement near the equipment may cause injury.
- Provide supervision if the equipment is used by persons who need supervision because of their health or INSUFFICIENT EXPERIENCE with inversion equipment. The inversion table may be used alone only if you take full responsibility for the inversion process, have exercise experience, feel no discomfort and can confidently bring the table back to the upright position yourself. Be aware that even an experienced person may be unable to return to the upright position for a number of unforeseen reasons. Make sure you have access to means of communication in case of an emergency.
- Use the equipment only for its intended purpose. Do not use additional items not recommended by the manufacturer.
- Use only a solid, level surface for installation. Make sure there is at least 0.5 m of free space around the equipment.
- Do not allow foreign objects to enter the openings of the equipment.
- Before use, check that all screws and nuts are securely fastened. If defects are found or an unusual noise is heard during assembly or use, stop using the equipment immediately until the problem is resolved.
- Make sure nothing interferes with the operation of the device: keep hair, clothing and jewelry away from moving parts. Wear close-fitting clothing to prevent fabric from catching in mechanisms and moving parts.
- Storing and using the table outdoors is prohibited.
- This device is intended for home use only. Maximum load: 136 kg. Maximum height: 195 cm.
- ONLY one person may use the equipment at a time.
- Monitor your condition: stop exercising immediately if you feel unwell. Do not use the equipment right after eating; if you feel nauseous, stop exercising.
- Be sure to consult a doctor before use.
This equipment cannot be repaired by the user. In case of breakdown or defects, contact the manufacturer or a certified service center.
For home use only. Not intended for commercial, rental or institutional purposes.
WARNING - RISK OF INJURY
Do not use the equipment under the influence of alcohol, drugs or medication that causes drowsiness or disorientation.
Inspect the device before each use. Make sure all fasteners are securely fixed.
Replace faulty components immediately. If necessary, keep the equipment out of use until it is repaired.
Place the equipment only on a level surface. Keep it away from slippery coverings and raised areas that could make the equipment move and cause an accidental fall.
Wear suitable footwear. Always wear tightly laced sneakers with flat soles. Do not wear shoes with thick soles, boots, high-top shoes or any footwear that covers the ankle, as this may interfere with fastening the ankle locking system.
Adjust the device settings correctly before use. This includes height, weight and inversion angle settings (if available).
Avoid sudden movements. All movements during exercise must be smooth. ALWAYS hold the safety handles while turning over. Do not use additional weights, elastic bands or other equipment during inversion.
For beginners:
- Use a partner's support to find the correct balance settings.
- Make sure you can return to the upright position on your own.
Stop using the equipment if you feel pain, dizziness or light-headedness. Return to the upright position immediately to recover.
Consult a doctor before use. Below is a list of medical contraindications for inversion.
Medical contraindications for inversion (non-exhaustive list)
- Middle ear infection
- Glaucoma
- Cardiovascular diseases
- Osteoporosis (brittle bones)
- Severe obesity
- Retinal detachment
- Spinal injuries
- Recent or unhealed fractures
- Pregnancy
- Conjunctivitis
- Cerebral sclerosis
- Inserted intramedullary pins
- Hernias (ventral, hiatal)
- High blood pressure
- Severe joint swelling
- Implanted orthopedic devices
- Anticoagulant therapy
Product Components
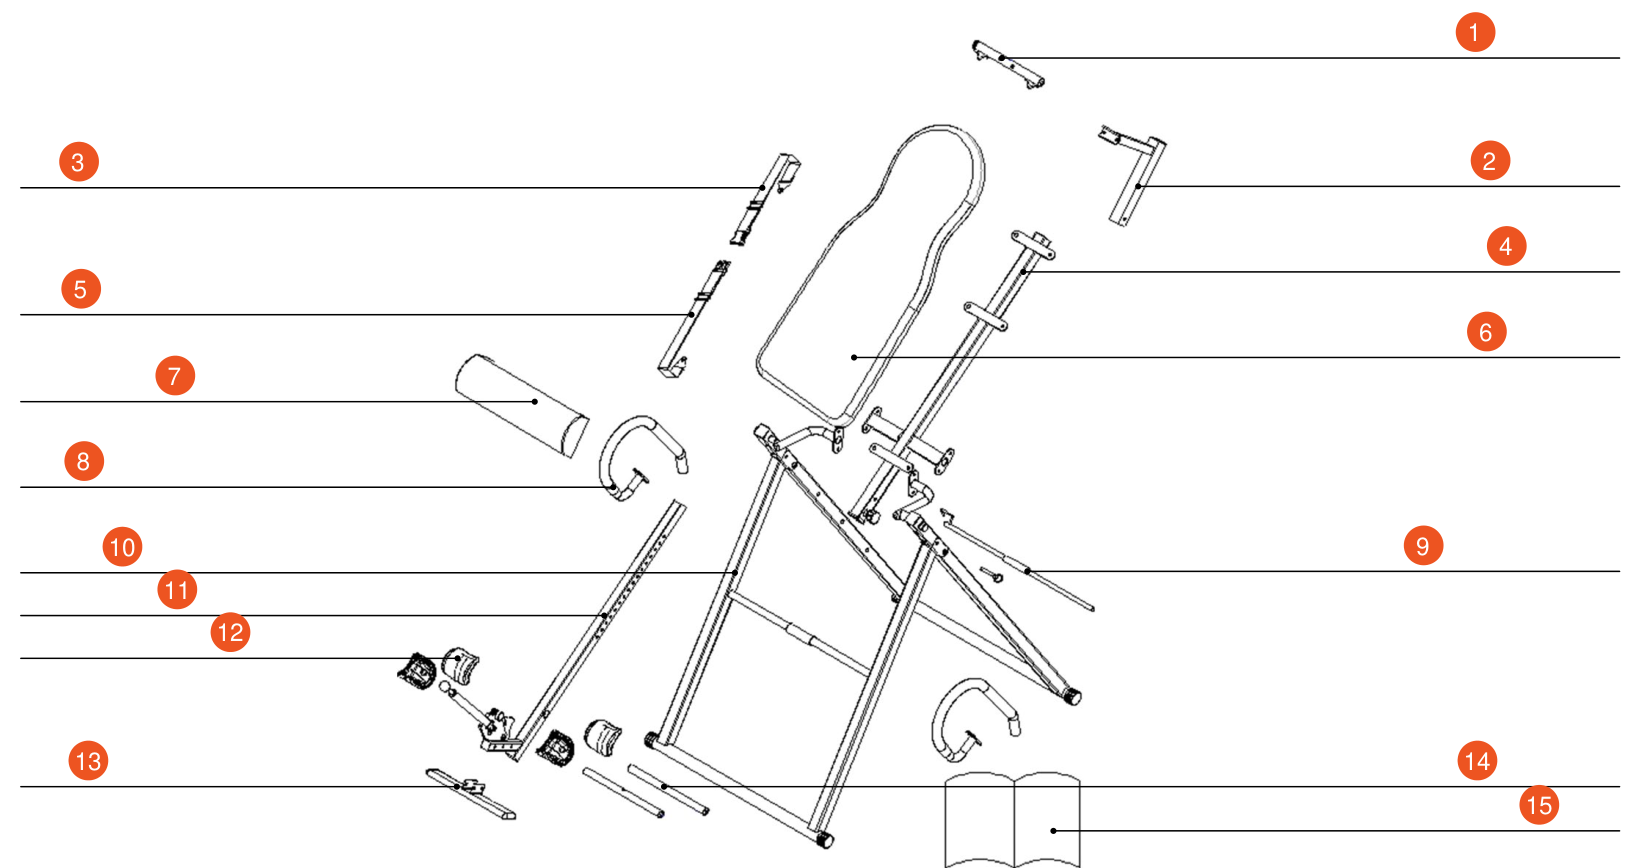
- Stretching bar
- Stretching frame
- Strap 1
- Backrest frame
- Strap 2
- Back cushion
- Lumbar cushion
- Handrail
- Rear locking bar
- Main frame
- Headrest frame
- U-shaped foot holders
- Footrest
- Foam rollers
- Manual
Packing List
| No. | Item | Qty |
|---|---|---|
| 1 | Main frame | 1 |
| 3 | Backrest frame | 1 |
| 4 | Headrest frame | 1 |
| 5 | Handrail | 2 |
| 6 | Back cushion | 1 |
| 7 | Footrest | 1 |
| 9 | Foam rollers | 2 |
| 10 | Strap 1 | 1 |
| 11 | Strap 2 | 1 |
| 12 | Stretching frame | 1 |
| 13 | U-shaped foot holders | 4 |
| 14 | Stretching bar | 1 |
| 15 | Lumbar cushion | 1 |
| 16 | Manual | 1 |
| 17 | Rear locking bar | 1 |
Accessory Bag Contents
| No. | Item | Size | Qty |
|---|---|---|---|
| 1 | Ball-ring screw | φ8×60 mm | 3 |
| 2 | Ball-ring screw | φ8×28 mm | 1 |
| 3 | Large flat head bolt | M6×16 mm | 6 |
| 4 | Button head bolt | M8×45 mm | 2 |
| 5 | Button head bolt | M8×55 mm | 4 |
| 6 | Button head bolt | M8×30 mm | 2 |
| 7 | Button head bolt | M8×20 mm | 6 |
| 8 | Flat washer | M8 | 13 |
| 9 | Lock nut | M8 | 10 |
| 10 | Hex key | M5 | 1 |
| 11 | Open-end wrench | 13–17 mm | 1 |
Assembly
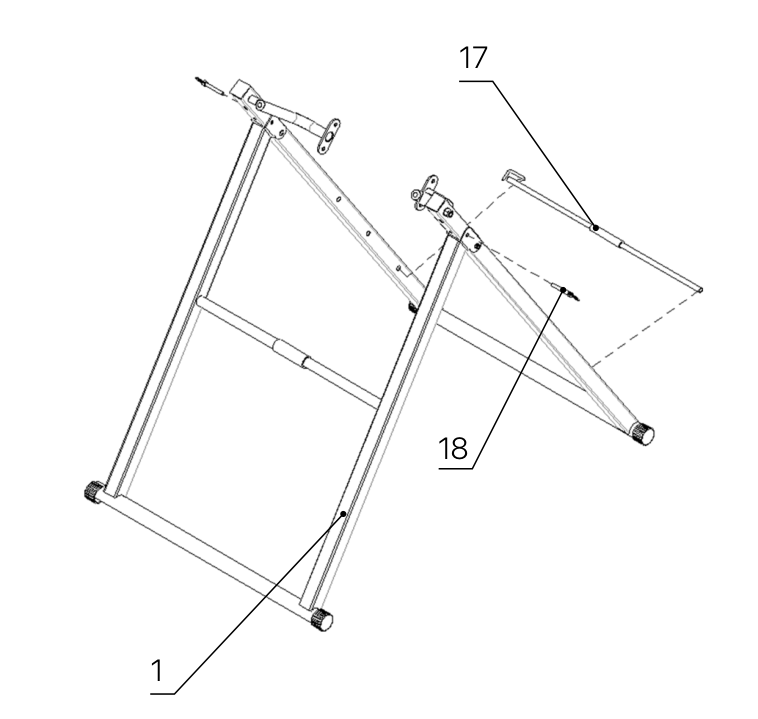
- Unfold the main support frame (No. 1) and insert the ring pin (No. 18) into the front and rear support joints.
- Set a suitable tilt angle and insert the rear locking bar (No. 17) into the holes on the sides of the rear support. For the first assembly, it is recommended to place the lock in the upper hole, then adjust the position for comfort.
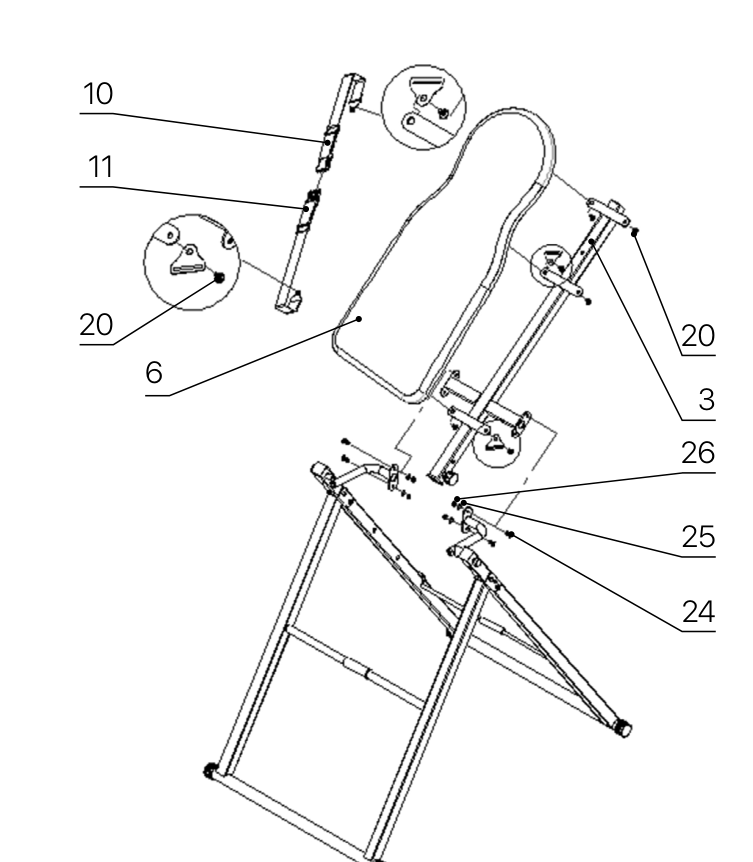
- Installing the backrest: Fasten the support plane to the side of the backrest frame (No. 3) with M8×20 bolts (No. 24), M8 washers (No. 25) and M8 lock nuts (No. 26).
- Fixing the cushion: Fasten the back cushion (No. 6) with M6×16 bolts (No. 20), at the same time attaching the straps (No. 10 and No. 11) to the metal plate on the backrest frame.
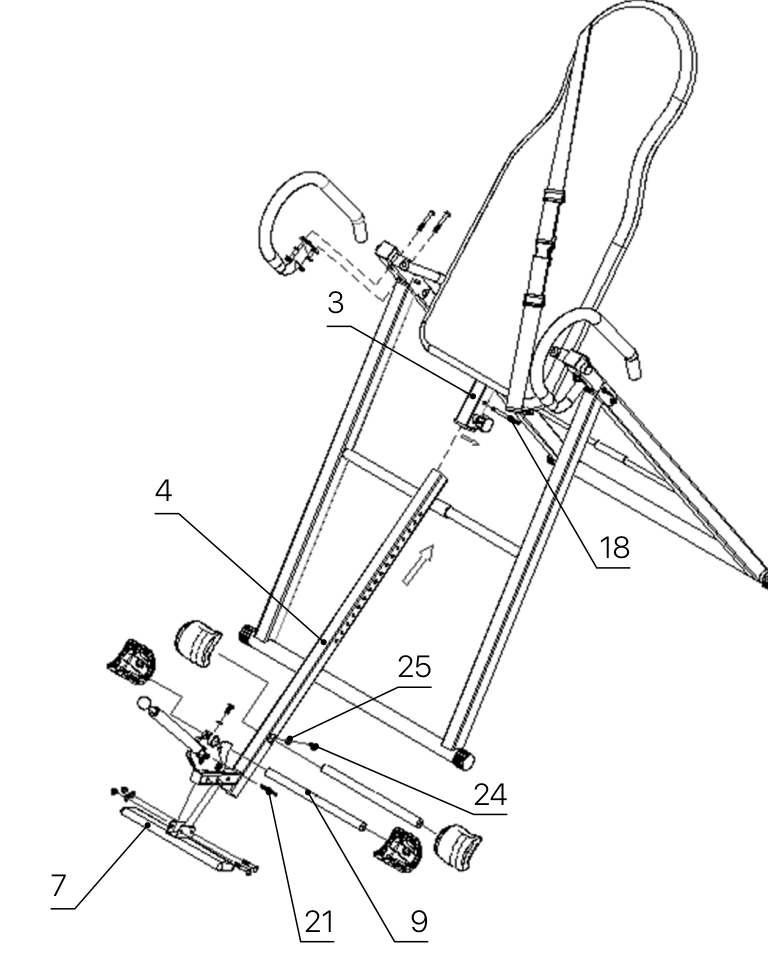
Height adjustment:
- Insert the height adjustment frame (No. 4) into the square tube of the backrest frame (No. 3) and secure it with the ring pin (No. 18) in the appropriate hole.
- Fasten the footrest (No. 7) to the lower part of the height frame with M8×45 bolts (No. 21), M8 washers (No. 25) and M8 lock nuts (No. 26).
- Insert the foam rollers (No. 9) into the holes on the height frame and fasten them with M8×20 bolts (No. 24) and M8 washers (No. 25).
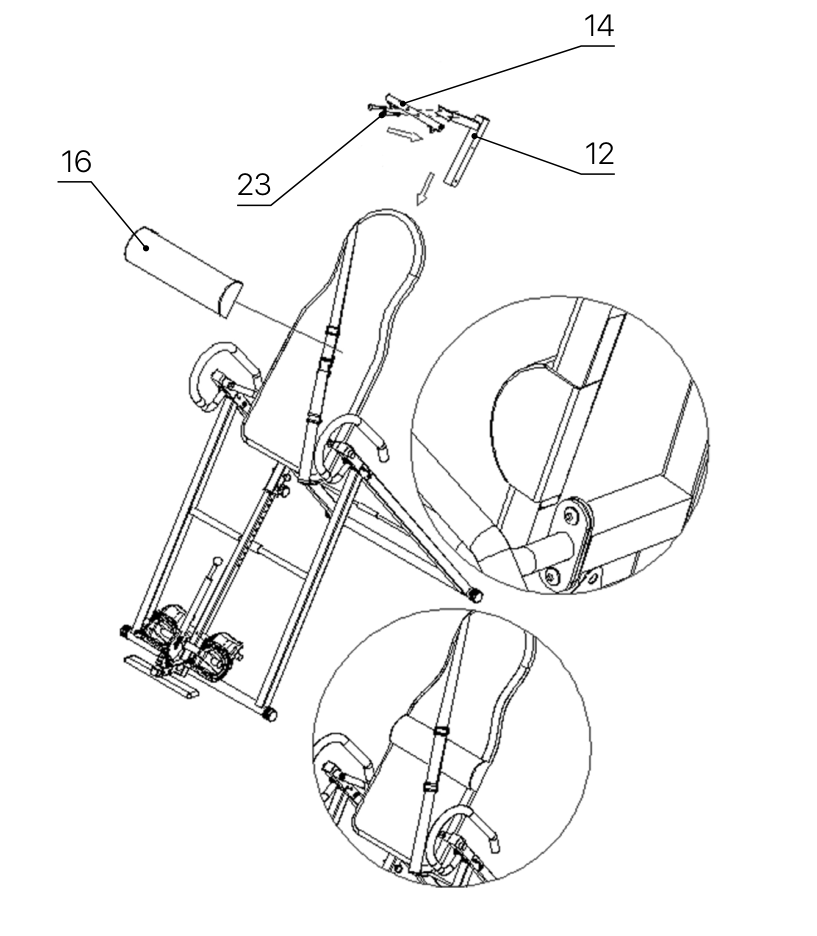
Installing additional elements:
- Installing the stretching frame (No. 12) and stretching bar (No. 14): fasten the stretching bar (No. 14) to the stretching frame (No. 12) with an M8×30 bolt (No. 23).
- Install the stretching frame (No. 12) on the backrest frame (No. 3) under the back cushion.
- Installing the lumbar cushion: attach the cushion (No. 16) to the back cushion using the hook-and-loop fasteners on the back of both cushions.
- The position of the cushion can be adjusted up or down depending on your height.
Warm-up and Cool-down Exercises
A successful workout program consists of three parts: warm-up, aerobic exercise and cool-down.
Warming up is the most important part of a workout and must be done before every session. Warming up helps to warm the body, stretch the muscles and prepare the body for more intense loads. Repeating the warm-up exercises after a workout helps to relieve muscle tension and ease pain. It is recommended to do suitable warm-up and cool-down exercises, as shown below:
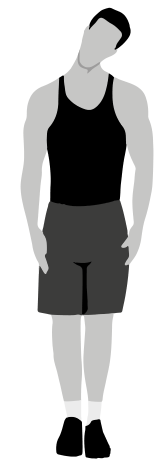
Head rolls
First pull your head toward your right shoulder, stretch your neck and turn your head once clockwise and once counterclockwise; pull your head toward your left shoulder and make one turn counterclockwise. Repeat.
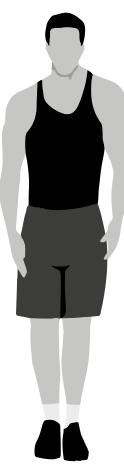
Shoulder lifts
Raise your left shoulder and make 5 backward rotations; then raise your right shoulder and make 5 backward rotations, alternating sides.
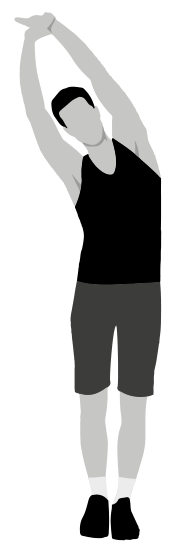
Side stretch
Raise your arms above your head, then grasp your right wrist with your left hand and reach upward until you feel your right arm fully stretched. Hold for 5 seconds before switching to the other arm.
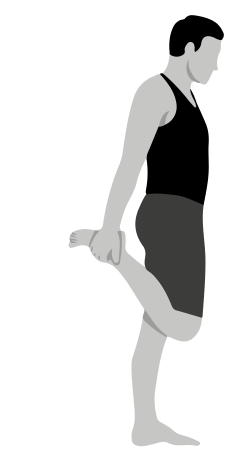
Quadriceps stretch
Holding onto a wall with your right hand for balance, pull your left foot back with your left hand, bringing the heel as close to your buttock as possible. Hold for 15 seconds, then repeat with the other leg.
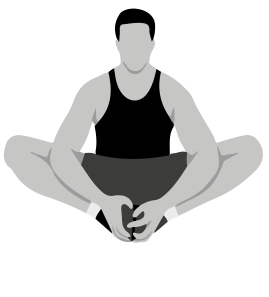
Inner thigh stretch
Sitting on the floor, put the soles of your feet together, clasp them with both hands and pull them in as close to your body as possible. Slowly press down on both heels and hold this position for 15 seconds.
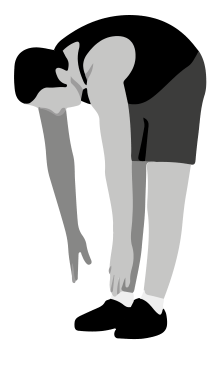
Toe touch
Slowly bend forward, relax your back and shoulders and reach for your toes. Bend as low as you can and hold the position for up to 15 seconds.
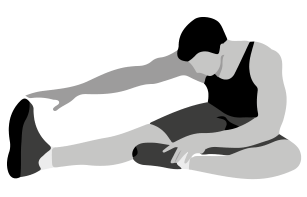
Hamstring stretch
Sit down, straighten your right leg, bend your left leg, grab your left ankle with your left hand and push it inward so that your left foot is as close to your torso as possible and the sole of the foot is against the inside of your right thigh. Then press forward with your body and reach both arms forward to touch your toes; the more pressure, the better. Hold this position for 15 seconds and switch to the left leg.
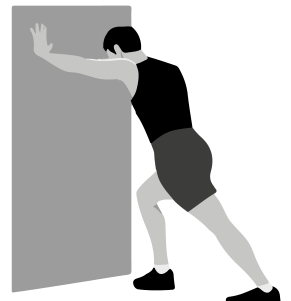
Calf stretch
Lean against a wall with both hands, tilt your body at a 45-degree angle to the floor and alternately move your left and right legs back, as if walking.
Adjustment and safety tips
- For the first use, the presence of an observer is required for safety.
- Make sure the foot securing system is firmly fixed and the rollers are installed symmetrically.
- Set the height adjustment scale according to your height. For example, if you are 160 cm tall, first set the height to 170 cm. If turning over is difficult, reduce the setting until turning over becomes easy.
- After each adjustment, secure the locking pin and insert the safety pin before use.
Usage plans
The inversion table is designed for stretching and improving flexibility, as well as for improving blood circulation and relieving tension in the spine. Use it for relaxing exercises and stretching, especially if you feel discomfort or tension in your back.
How to use the equipment correctly
- Stand on the platform and secure your ankles in the locking system.
- Slowly begin to lean back, controlling the movement with your hands.
- Use the foot support and adjust the tilt angle to achieve optimal stretching.
Entering inversion
- Raise your arms up to begin the inversion.
- If you want to increase the tilt angle, keep slowly raising your arms above your head.
- To return to the upright position, lower your arms back down.
Height settings
- The height setting adjusts the tilt angle and the inversion position. Make sure you set the height correctly according to your height and weight for safe and effective inversion.
Foot locking system
- The foot locking system helps to hold your ankles securely and prevents them from slipping. Check that the locks are properly fastened before use.
Recommendations for beginners
Use a helper. For the first inversion sessions, ask a partner to help you with the settings and to ensure your safety.
Start with partial inversion. Gradually increase the tilt angle until you feel confident.
Watch the time. In the first sessions, do not stay inverted for longer than 1–2 minutes. You can increase the duration over time.
Equipment care recommendations
Inspect the equipment regularly. Make sure all screws, nuts and pins are securely fastened before each use.
Cleaning. Use a soft cloth to clean the equipment. Do not use abrasive products, so as not to damage the surfaces.
Storage. Store the equipment in a dry place, away from direct sunlight and heat sources.
Important reminders
- Consult a doctor before starting any exercise, especially if you have heart conditions or vascular or bone problems.
- Do not use the equipment for more than 15–20 minutes at a time, to avoid overloading the body.
- Wear suitable clothing and footwear. Do not exercise barefoot or in clothing that is too loose.
- Monitor your condition during exercise and stop if you feel discomfort.
Warranty
Genau guarantees the high quality and reliability of its products. We strive to offer only the best, which is why all of our equipment comes with a warranty.
Warranty Terms
- The warranty period starts from the date of sale.
- The warranty covers defects caused by manufacturing faults or defective materials.
- Warranty service is carried out at authorized service centers.
- If the product breaks down during the warranty period, the customer must bring this warranty card and the complete product to a service center for diagnostics and repair.
- If the warranty claim is confirmed, the product will be repaired or replaced free of charge.
- The warranty does not cover the following cases:
- mechanical damage caused by improper use or transportation;
- damage caused by liquids, fire, chemicals or other external factors;
- failures caused by not following the operating instructions;
- modifications to the design or repairs carried out by unauthorized persons without the approval of the Service;
- consumables and components with a limited service life (belts, batteries, etc.).
Warranty claims
To receive warranty service, the customer should contact the seller (the place where the equipment was purchased).
Specifications
| Parameter | Value |
|---|---|
| Maximum load | 136 kg |
| Maximum height | 195 cm |
Manufacturer: Zhejiang Dapao Technology Co., Ltd. No. 65, Baihua Mountain Industrial Zone, Wuyi County, Zhejiang Province.
Service
For questions about assembly, operation and warranty, please contact Genau service in Kyrgyzstan.
Genau GmbH LLC (ОсОО «Генау ГМБХ»), Kyrgyzstan. Phone: +996 778 639 000