Genau Rhino Pro multifunctional adjustable bench
User Manual
Contents
Thank you for your purchase!
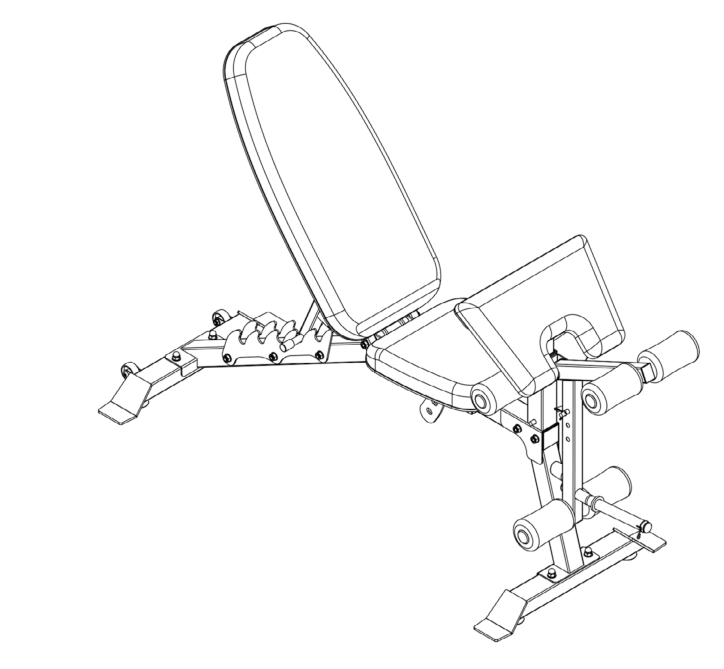
Thank you for purchasing the Genau Rhino Pro multifunctional adjustable bench. Please use the equipment correctly to ensure your safety and health. Before use, read the information below carefully.
Please read this manual before assembling and using the treadmill.
As part of our commitment to continuous improvement, the product may be updated when necessary without prior notice. If this manual does not match the product, the actual product takes precedence.
Safety Instructions
- Keep children and pets away from the machine and do not leave children unattended in the room where it is installed.
- The machine is intended for one user at a time.
- If you feel dizzy, nauseous, tightness in the chest or other symptoms, stop exercising immediately and see a doctor.
- Place the machine only on a flat, clean surface. Do not use it near water or outdoors.
- Keep your hands away from rotating parts.
- Training clothes should be close-fitting and the right size to avoid getting caught.
- Exercise only in accordance with the manual. Use of the machine by third parties not named in the instructions is prohibited.
- Keep sharp objects away from the machine.
- People with disabilities must not use the machine without the supervision of an instructor or assistant.
- Do a warm-up before exercising.
- If the machine does not work properly or is damaged, do not use it.
- Keeping a training diary is recommended to monitor your progress.
- The device is intended for home use only.
Components
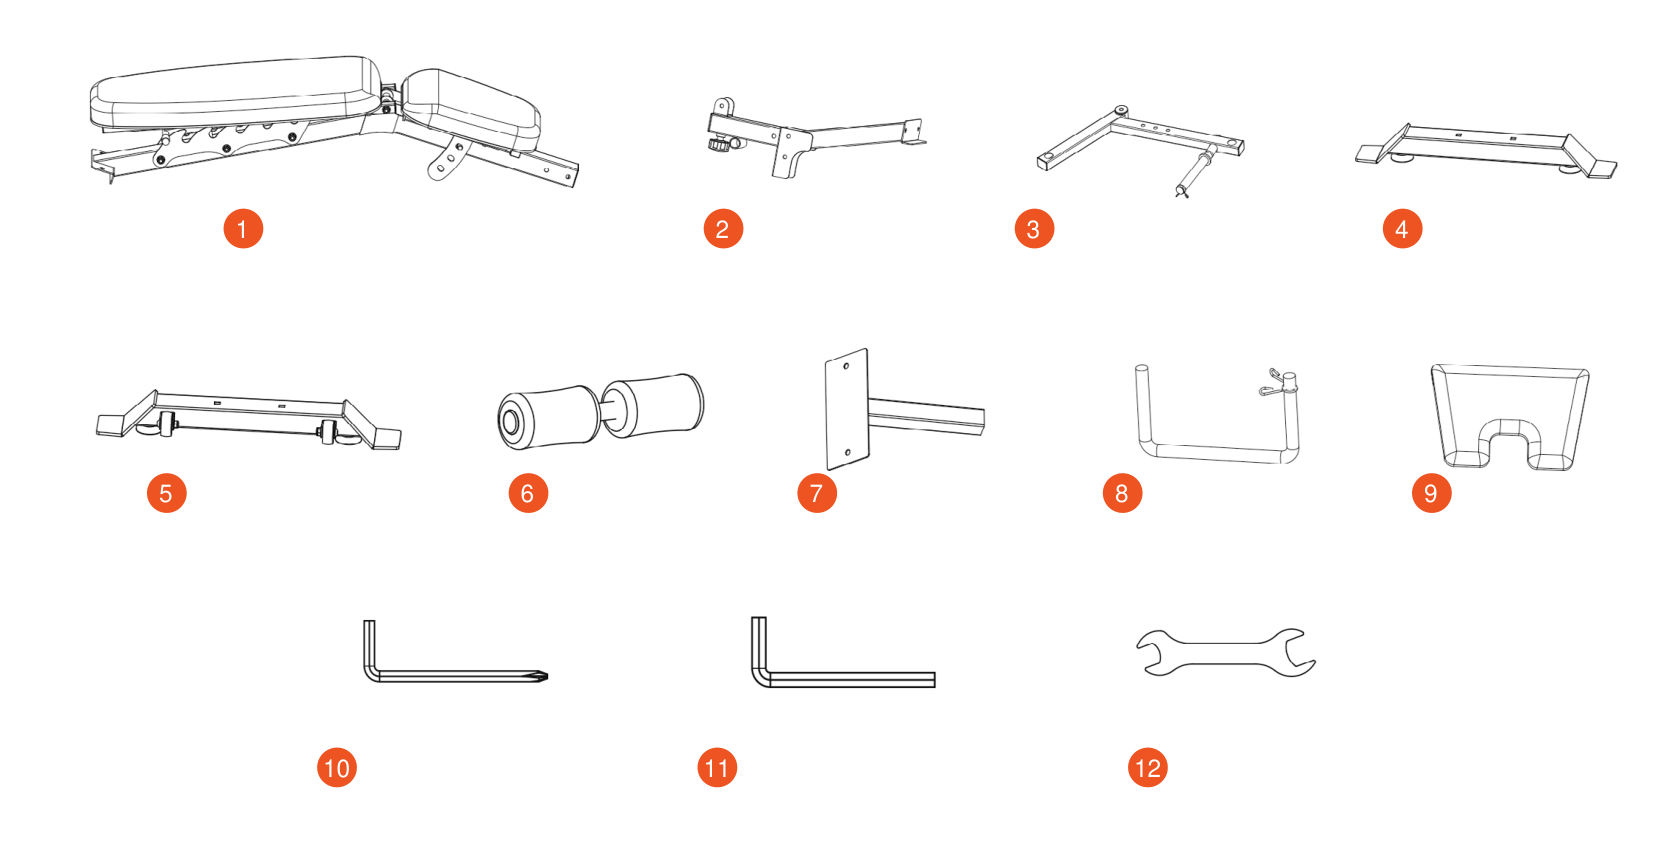
- Main frame, 1 pc
- Support tube, 1 pc
- Hook tube, 1 pc
- Front support leg, 1 pc
- Rear support leg, 1 pc
- Foam roller, 3 pcs
- Platform support post, 1 pc
- Limiter rod, 1 pc
- Platform, 1 pc
- Hex key No. 5, 1 pc
- Hex key No. 6, 1 pc
- Open-end wrench 13–17 mm, 1 pc
Spare parts list
| No. | Item | Qty |
|---|---|---|
| 14 | Round head bolt with square neck M10×50 | 4 |
| 15 | Flat washer Φ10 | 7 |
| 16 | Cap nut M10 | 2 |
| 17 | Hex head screw M10×65 | 1 |
| 18 | Lock nut M10 | 4 |
| 19 | Hex head screw M10×60 | 3 |
| 20 | Hex head screw M8×15 | 2 |
Assembly
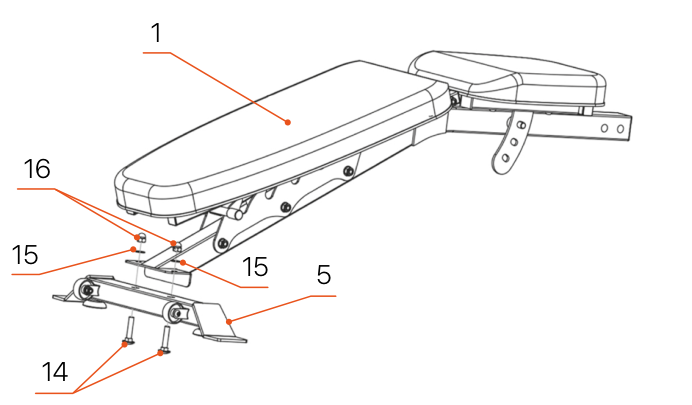
- Install part No. 5, the rear support tube, onto No. 1, the main frame. Use: 2 pcs No. 14, round head bolt M10×50; 2 pcs No. 15, flat washer Φ10; 2 pcs No. 16, cap nut M10.
- Tighten the nuts clockwise with wrenches No. 12 (13–17 mm) and No. 11 (hex No. 6).
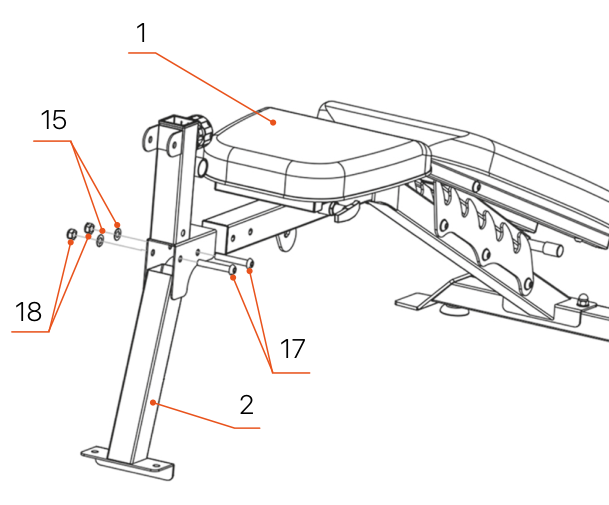
- Install part No. 2, the connecting tube, onto No. 1, the main frame. Use: 2 pcs No. 18, lock nut M10; 2 pcs No. 15, flat washer Φ10; 2 pcs No. 17, hex head screw M10×65.
- Tighten the nuts clockwise with wrenches No. 12 (13–17 mm) and No. 11 (hex No. 6).
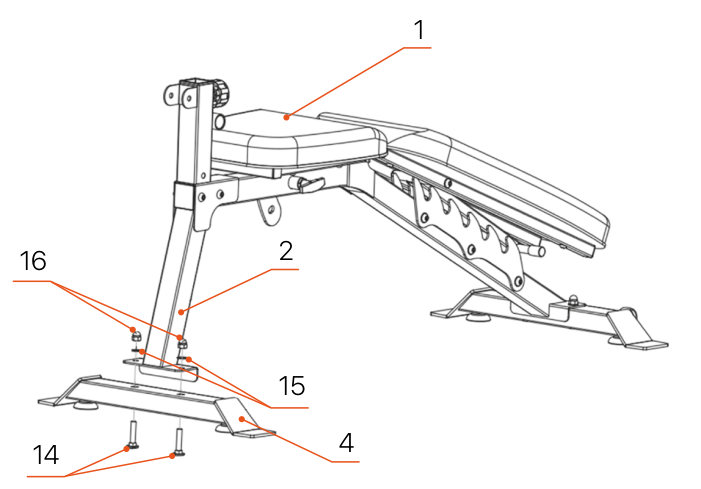
- Install part No. 4, the front support tube, onto No. 2, the support tube. Use: 2 pcs No. 14, round head bolt M10×50; 2 pcs No. 15, flat washer Φ10; 2 pcs No. 16, cap nut M10.
- Tighten the nuts clockwise with wrenches No. 12 (13–17 mm) and No. 11 (hex No. 6).
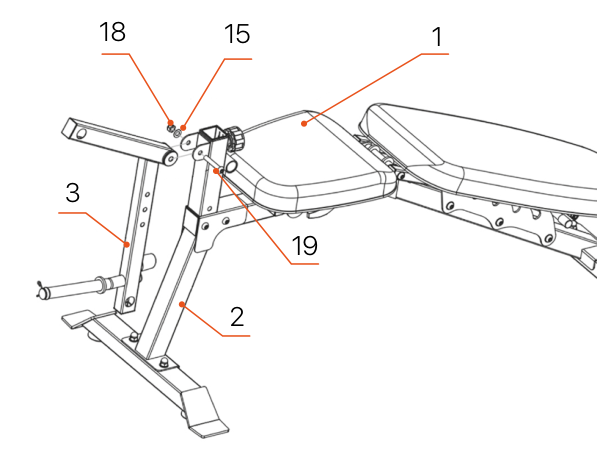
- Install part No. 3, the hook tube, onto No. 2, the support tube. Use: 1 pc No. 19, hex head screw M10×60; 1 pc No. 15, flat washer Φ10; 1 pc No. 18, lock nut M10.
- Tighten the nut clockwise with wrenches No. 12 (13–17 mm) and No. 11 (hex No. 6).
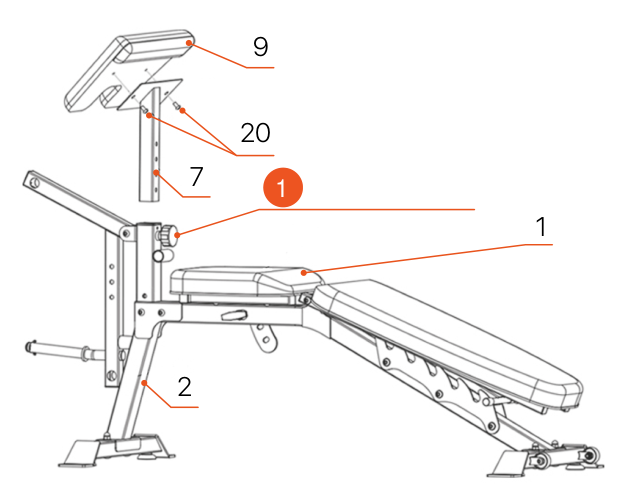
- Spring knob
- Align bracket No. 9 with the hole in platform support tube No. 7 and, using hex key No. 10 (No. 5), tighten the two hex head screws No. 20 (M8×15) clockwise.
- Loosen the plastic locking knob ("plum knob") on tube No. 2, insert platform support tube No. 7 into tube No. 2, set the required position using the adjustment holes and tighten the locking knob again.
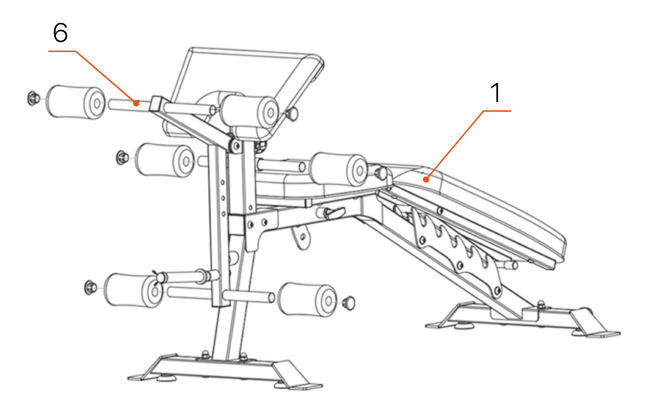
- Remove foam rollers No. 6. As shown in the picture, insert tube No. 2 (hook tube) and tube No. 3 (hook tube). Put the foam rollers back and secure them with end caps at both ends.
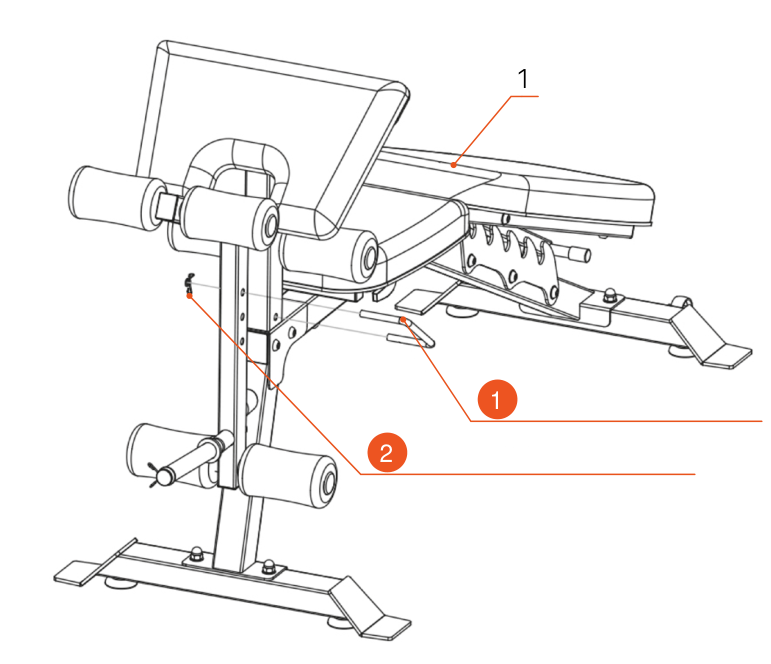
- Limiter rod
- Limiter spring
- Remove limiter rod No. 8. As shown in the picture, choose a suitable adjustment hole to set tube No. 3 (hook tube) to a comfortable ergonomic level. Put the limiter rod back.
- Assembly is now complete.
Workout Tips and Recommendations
Warm-up and Cool-down
A successful exercise program consists of three parts: warm-up, cardio training and cool-down.
Warm-up is a very important part of a workout. A warm-up must be done before every workout. It helps warm up the body, stretch the muscles and allows the body to adapt to more intense exercise.
Repeating the warm-up at the end of the exercise can help relieve muscle soreness.
We suggest doing the appropriate warm-up and cool-down exercises according to the following scheme:
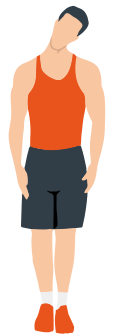
Head rolls
First pull your head toward your right shoulder, stretch your neck and turn your head once clockwise and once counterclockwise; pull your head toward your left shoulder and make one turn counterclockwise. Repeat.
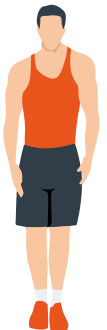
Shoulder lifts
Raise your left shoulder and make 5 backward rotations; then raise your right shoulder and make 5 backward rotations, alternating sides.
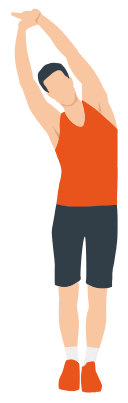
Side stretch
Raise your arms above your head, then grasp your right wrist with your left hand and reach upward until you feel your right arm fully stretched. Hold for 5 seconds before switching to the other arm.
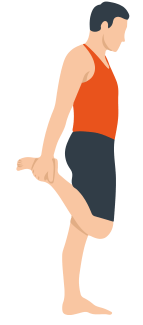
Quadriceps stretch
Holding onto a wall with your right hand for balance, pull your left foot back with your left hand, bringing the heel as close to your buttock as possible. Hold for 15 seconds, then repeat with the other leg.
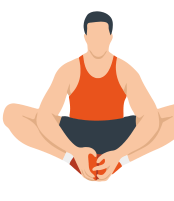
Inner thigh stretch
Sitting on the floor, put the soles of your feet together, clasp them with both hands and pull them in as close to your body as possible. Slowly press down on both heels and hold this position for 15 seconds.
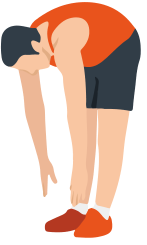
Toe touch
Slowly bend forward, relax your back and shoulders and reach for your toes. Bend as low as you can and hold the position for up to 15 seconds.
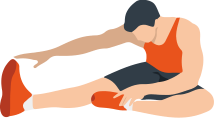
Hamstring stretch
Sit down, straighten your right leg, bend your left leg, grab your left ankle with your left hand and push it inward so that your left foot is as close to your torso as possible and the sole of the foot is against the inside of your right thigh. Then press forward with your body and reach both arms forward to touch your toes; the more pressure, the better. Hold this position for 15 seconds and switch to the left leg.
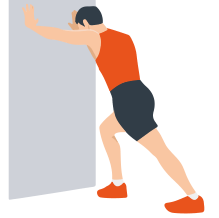
Calf stretch
Lean against a wall with both hands, tilt your body at a 45-degree angle to the floor and alternately move your left and right legs back, as if walking.
Warranty
Genau guarantees the high quality and reliability of its products. We strive to offer only the best, which is why all of our equipment comes with a warranty.
Warranty Terms
- The warranty period starts from the date of sale.
- The warranty covers defects caused by manufacturing faults or defective materials.
- Warranty service is carried out at authorized service centers.
- If the product breaks down during the warranty period, the customer must bring this warranty card and the complete product to a service center for diagnostics and repair.
- If the warranty claim is confirmed, the product will be repaired or replaced free of charge.
- The warranty does not cover the following cases:
- mechanical damage caused by improper use or transportation;
- damage caused by liquids, fire, chemicals or other external factors;
- failures caused by not following the operating instructions;
- modifications to the design or repairs carried out by unauthorized persons without the approval of the Service;
- consumables and components with a limited service life (belts, batteries, etc.).
Warranty claims
To receive warranty service, the customer should contact the seller (the place where the equipment was purchased).
Manufacturer
Manufacturer: Zhejiang DDS Sports Equipment Co., Ltd. ADD: No. 2, Jingui South Road, Huachuan Industrial Zone, Yongkang City, Zhejiang Province, China.
Service
For questions about assembly, operation and warranty, please contact Genau service in Kyrgyzstan.
Genau GmbH LLC (ОсОО «Генау ГМБХ»), Kyrgyzstan. Phone: +996 778 639 000